


Interactive office floor plans are one of those features that seem like a “nice to have” until you actually use them. Then you wonder how you ever managed without them.
Instead of picking “Meeting room A” from a list and hoping it is the right space, people can see the office layout, check what is free, and book a desk or room directly from a visual map. They can see where their team is sitting, how far a room is from their usual spot, and which areas are quieter or more collaborative.
In this guide, we will walk through what interactive floor plans are, how they work in a tool like Archie, and why they make hybrid office life much easier for both employees and admins.
Creating interactive office floor plans
What is an interactive office floor plan?
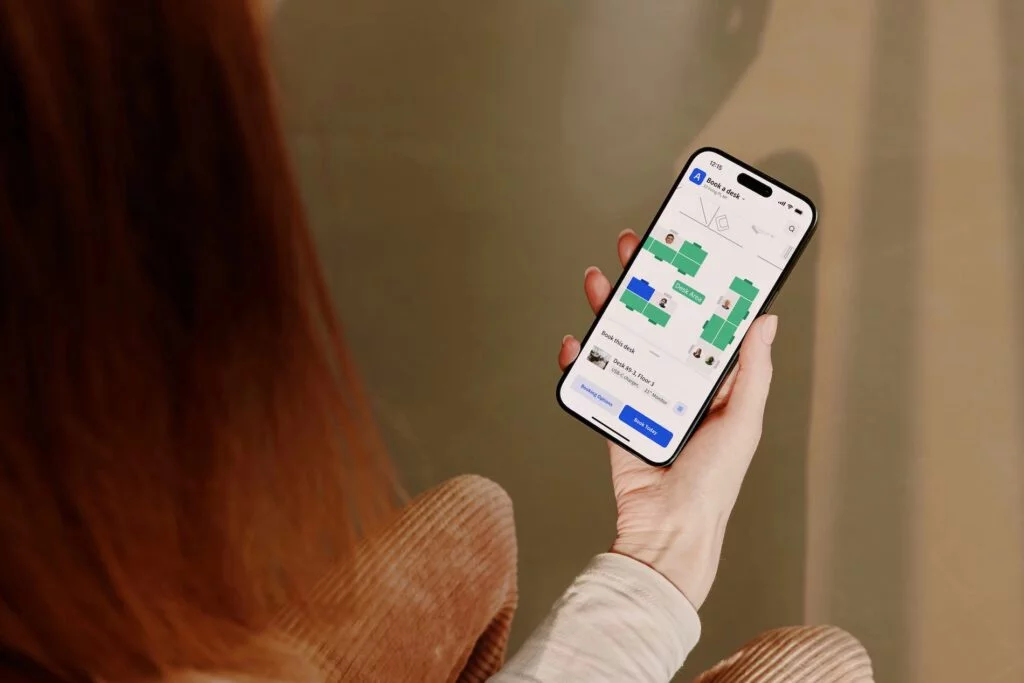
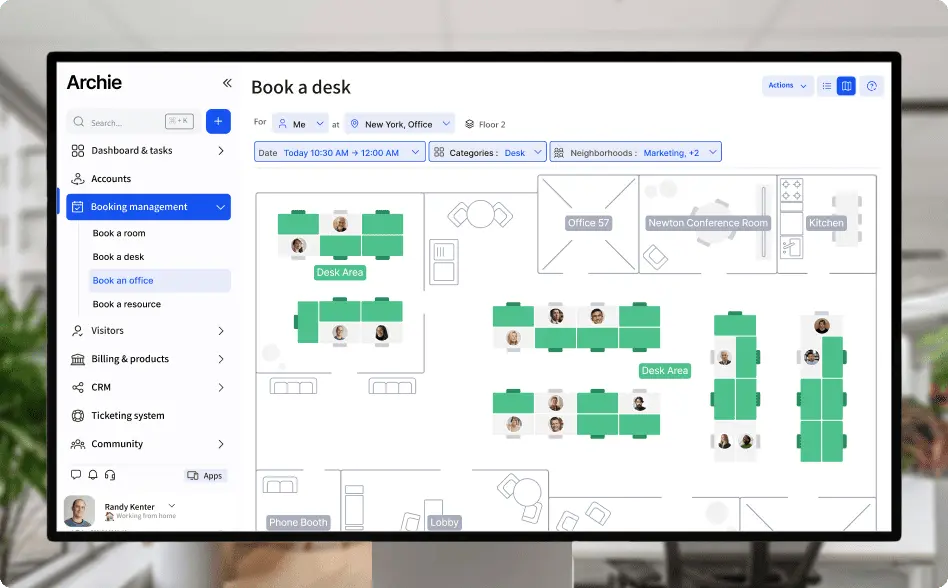
An interactive floor plan is a 2D map of your office that you can click on and use to book resources.
Instead of just a static image of your layout, the map is connected to your booking system. Desks, meeting rooms, phone booths, and other resources sit on top of the floor plan as clickable items. People can select a specific space, see its details, and reserve it in real time.
Why your office needs an interactive floor plan
Having a floor plan built into your reservation process is not just a nice visual touch. It solves real, everyday problems that show up in modern offices, especially when people split their time between home and the workplace:
#1 Better wayfinding in larger offices
In larger or multi-floor offices, most people know their usual corner, but not the full layout. Room names like “Room 3.12” or “Huddle 7” do not mean much on their own. If you are new, visiting, or only come in a few days a week, it is easy to get confused. You might book a room that is far from your team, or spend the first ten minutes of a meeting walking around looking for it.
With an interactive floor plan, the booking process already includes a visual guide. When you look for a room or desk, you see exactly where it sits on the map, how to reach it, and what is nearby. You can tell if it is close to the main entrance, near the kitchen, or tucked away in a quiet corner.
This is especially helpful for:
- New hires who are still learning the layout and do not yet have a mental map of the office
- Visitors or contractors who only come in occasionally and do not have time to wander around
- Teams that sit in different parts of the building on different days need a quick way to understand where they are going
Instead of relying on long instructions in calendar invites or separate PDF maps, people can simply use the floor plan that is already part of their reservation flow. Over time, this reduces small but annoying frictions, like late arrivals, lost guests, and “Where is that room again?” conversations. The floor plan moves from being a static diagram to a tool that actually supports daily work.
In some offices, teams even add small labels or signs to rooms and zones so people can quickly open the right view on their phone instead of asking around. Being able to create a QR code that points to a specific area or booking page can be a simple, low-effort way to help visitors and hybrid employees orient themselves without interrupting others.
#2 Sitting near the team and finding colleagues
Hybrid work has made “Where are you sitting today?” a very common question. When people are free to choose desks and move between zones, it is great for flexibility, but not always great for coordination. If all you see is a list of desk numbers, it is hard to tell who you will be sitting next to or how far you are from your team.
Interactive floor plans change this completely. In hybrid office software ls like Archie, you can see where your teammates are sitting on a given day and then choose a desk right next to them. The map shows you occupied and available seats in context, not just as names in a table.
Without an interactive office seating plan tool, the process might look like this: you book “Desk 21,” your colleague books “Desk 34,” and you only discover later that you are on opposite sides of the floor. With an interactive map, the process becomes:
- Search for a colleague
- See their seat on the map
- Pick a nearby desk in a few clicks
This is powerful for collaboration days, project sprints, or onboarding. A manager can encourage the team to book a cluster of desks in the same zone. A new joiner can easily sit near their mentor. Cross-functional teams can plan to sit together for a few days while they work on a shared project.
The result is that people do not need to coordinate manually over chat to figure out seating. They can simply open the map, see where others are, and choose a spot that makes sense. It reduces back and forth, and makes the office feel more social and more intentional.
#3 Choosing the right space for the task
Not all seats and rooms are created equal. Some areas are loud and collaborative, others are quiet and focused. Some meeting rooms have full video setups, others are better for quick standups. When you only see a list of names and capacities, it is hard to know which space is actually right for your work that day.
A visual layout solves this by showing you how the office is organized and what kind of work each area supports. For example:
- If you need quiet focus, you can see which desks are in a designated quiet zone, away from high-traffic areas.
- If you are running a workshop, you can pick a larger room near your team’s neighborhood, with the right equipment and furniture.
- If you know you will be printing and sharing materials, you can choose a space near a printer, storage area, or whiteboard wall.
You are no longer guessing based on a room name that does not mean much on its own. You are choosing based on a clear, visual overview of the space. Over time, this helps people match their work to the right environment.
For the organization, this also leads to better use of the office. Popular areas are easier to spot, and underused corners can be rethought. For employees, it simply makes each office day smoother. They spend less time fixing small problems like noise, distance, or missing equipment, and more time actually doing their work.
How interactive floor plans work for employees in Archie
Open Archie on your preferred device
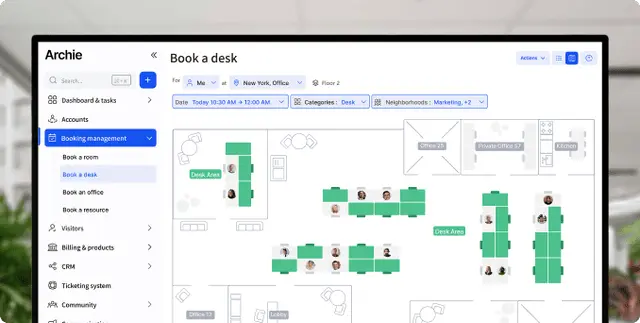
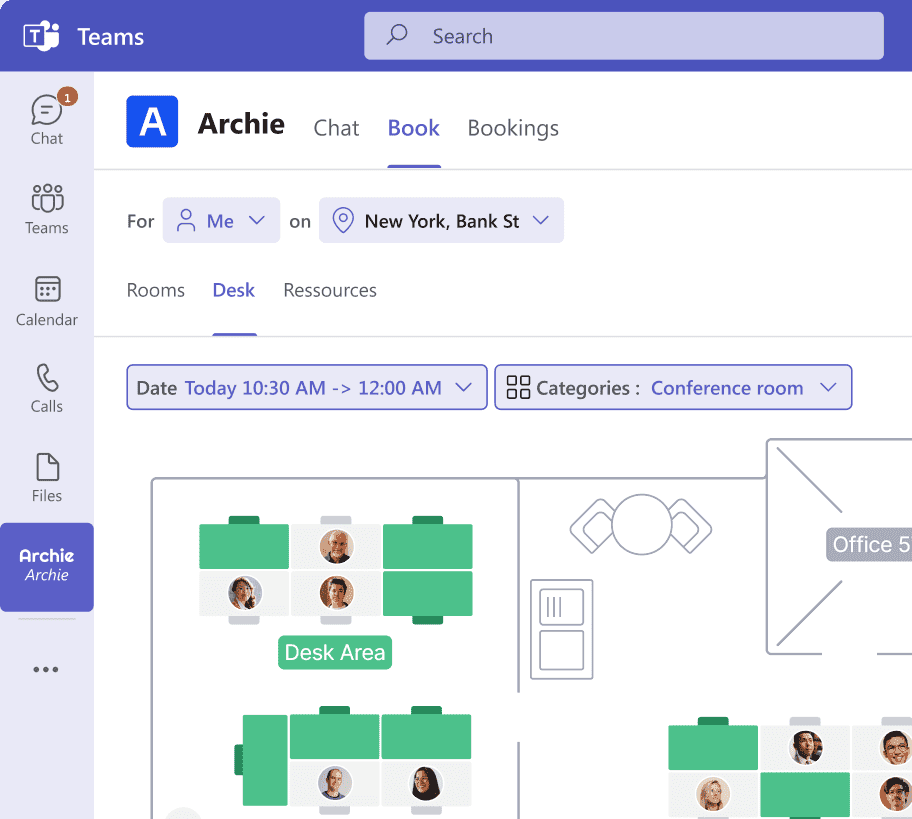
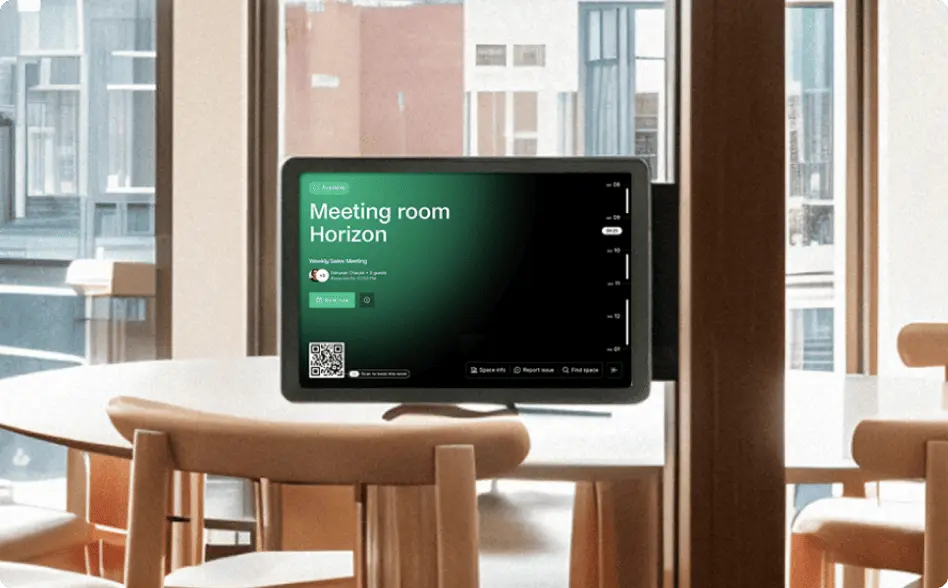
Employees can access the same floor plan from several places. They might open Archie in a browser on their laptop, use the mobile app on the way to the office, tap a kiosk screen in the lobby, or open it inside Microsoft Teams.
Wherever they start, they see the same 2D office layout — and that consistency matters. People do not have to relearn different views or interfaces on different devices. They recognize the map at a glance and can start exploring straight away.
Browse the map and see live availability
Once the floor plan is open, the office layout comes to life. Desks, meeting rooms, offices, phone booths, and other bookable resources are placed directly on the map as clickable items.
Employees can quickly scan the plan and see which spaces are free, reserved, or already in use for their chosen time. Instead of scrolling through a long list of names, they get a clear visual picture of what is available and where it is located.
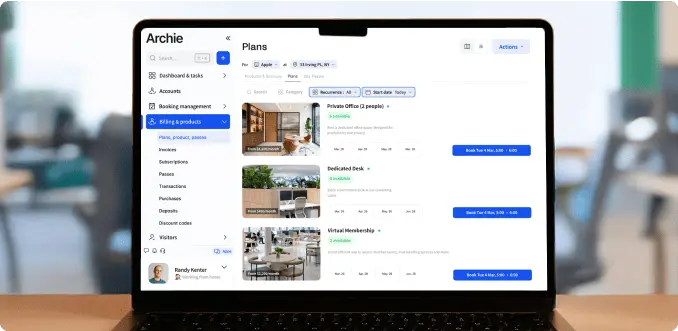
Check space details before booking
When someone clicks on a resource, they do not just see a name. Archie shows them helpful details so they can decide if that space is a good fit.
For a meeting room, that might include the capacity, whether it has a screen or video conferencing setup, and what kind of meetings it is best suited for. For a desk, it could include whether there is a monitor, a docking station, or what type of zone it is in, such as a quiet area or a collaboration zone.
Find colleagues and sit nearby
Another key part of the experience is being able to see where colleagues are sitting. On collaboration days or project sprints, people often want to be close to their team.
In Archie, employees can locate teammates on the floor plan and then pick a desk or office nearby. This works well for team days, onboarding weeks, or any situation where it helps to be physically close. Instead of sending messages like “Where are you sitting?” people can simply open the map and see the layout of their team.
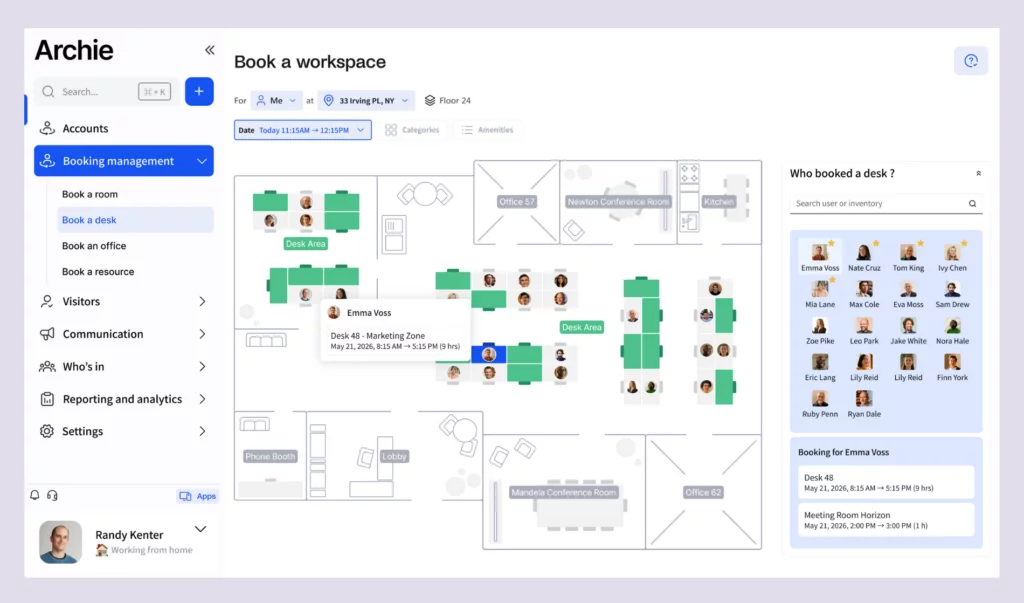
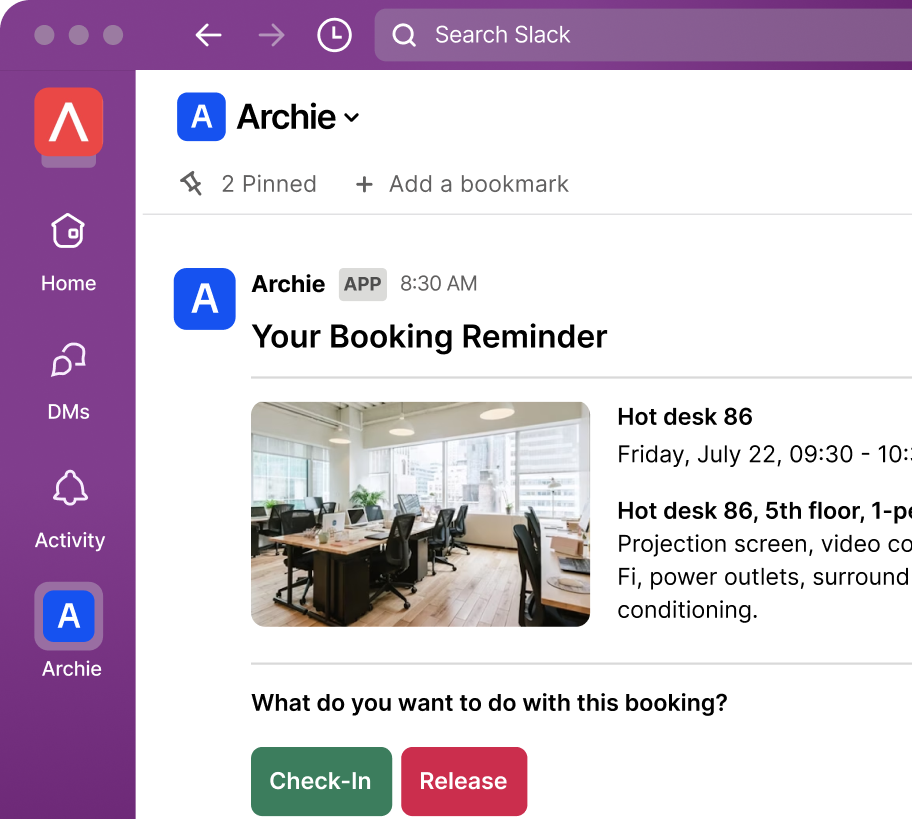
Book directly from the map
Once someone has chosen a space, the final step is simple. They confirm the time and book directly from the map. There is no need to switch to a different screen, copy room names, or hunt for the right option in a separate list.
The entire flow happens in one place: open the map, explore, choose a spot, and reserve it.
How to create an interactive office floor plan in Archie
The real magic of a good interactive floor plan is not just how it looks, but how easy it is to keep up to date as your office changes. Desks move, teams grow, zones get repurposed. If every small change required a designer or developer, the map would be out of date in no time. That is where the admin side of Archie really matters.
Archie is built so that workplace, IT, or office managers can manage floor plans themselves, without needing technical skills:
Step 1: Upload your office layout
Everything starts with a simple office plan. As an admin, you upload a file of your layout, usually a PNG or JPEG. This image becomes the base layer for your interactive floor plan.
You can upload different types of plans, depending on how your space is organized. For example, you might use:
- A full floor layout for an entire level
- A more focused plan for a specific area, such as a collab zone or wing
- Separate plans for each floor, building, or location
Once the image is in Archie, it is ready to be turned into a clickable, bookable map. At this stage, it is still just a static image. The next steps are about bringing it to life.
Step 2: Build your space inventory
Next, you define the resources that live on top of that plan. In Archie, this is your space inventory. It is a structured list of everything people can book or use, such as:
- Desks
- Meeting rooms
- Phone booths
Collaboration zones - Private offices
Each of these items is more than a name. You can customize them with details that matter for booking and reporting, such as:
- The name and type of space
- Capacity
- Amenities, such as screens, video conferencing, whiteboards, or dual monitors
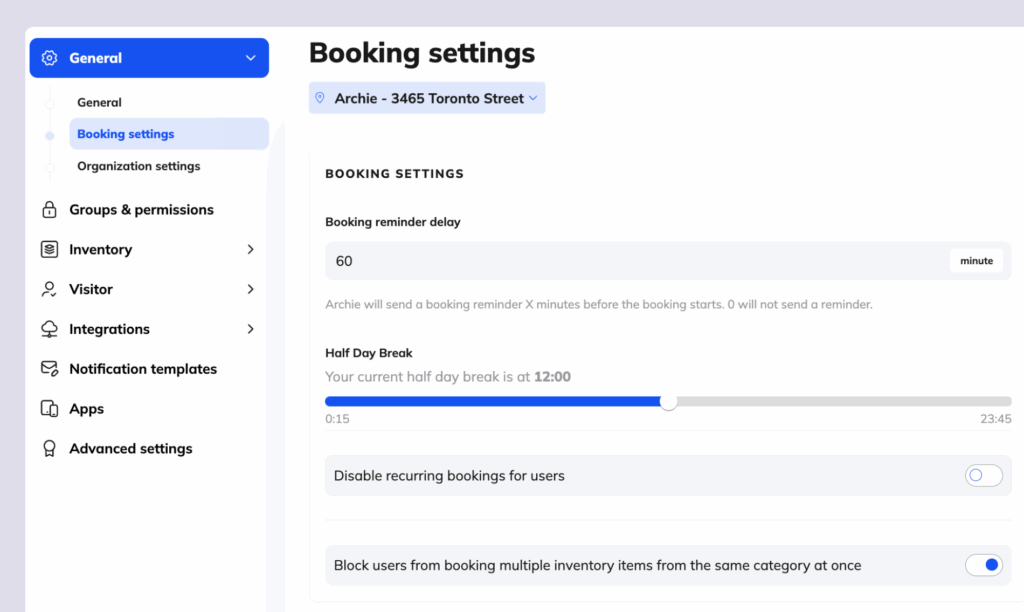
- Booking rules, such as who can reserve it, at what times, and under which conditions
This inventory becomes the backbone of your booking system. Every item in it can be placed on the floor plan and booked by employees. It also feeds into occupancy analytics, so your layout and your data stay in sync.
Step 3: Drag and drop resources onto the floor plan
Once your inventory is in place, you can connect it to the visual layout. This is where the interactive plan really starts to take shape.
As an admin, you simply drag each resource from the inventory and drop it onto the map in the correct spot. You might:
- Place a “Conference Room – Floor 1” in the exact room on the plan
- Add a row of hot desks inside the collab zone
- Position phone booths along a corridor
The interface is designed so you do not need any design or development skills. You are just aligning your digital plan with your physical office. If you know where things are in the building, you can map them in Archie.
Step 4: Edit layouts as your office evolves
No office layout stays the same forever. You might expand a collaboration area, introduce quiet focus zones, convert hot desks into assigned desks, or reconfigure meeting rooms to support more hybrid meetings.
With Archie, you can reflect these changes directly in the floor plan, without asking IT or a vendor to step in.
A few simple examples:
- If you want to add a new desk in the collab zone, you create a desk in the inventory and then drop it into the zone on the map.
- If you rename a room or change its capacity, you update the inventory item, and that change automatically appears everywhere the room is used.
- If you open a new floor or location, you upload the new floor plan, add the relevant spaces to your inventory, and connect them with your booking rules.
Because the layout is built on top of your space inventory, the visual map, booking rules, and analytics all stay connected. When you make a change in one place, it stays consistent across the system.
Want to see it in action?
Some space management tools charge extra every time you want to set up or change a floor plan. With Archie, you can handle it yourself whenever you need, without waiting on a vendor.
If every layout update needed a designer, a developer, and a long back-and-forth, your map would be out of date in no time. Teams move, zones shift, new desks appear, and suddenly the floor plan no longer matches the real office.
Archie is built to avoid that. Admins get:
- A simple way to upload or replace office plans
- A clear space inventory that they can manage on their own
- Drag and drop placement for desks, rooms, and other resources
- Easy editing when capacities, rules, or room names change
In practice, this means you can keep your floor plans live, accurate, and useful without pulling in IT or running a separate project every time you tweak the layout.
If you want to see how interactive office floor plans work in real life, take Archie for a spin and try building a floor plan yourself.